Can You Use Magnetic Lasso to Make Line Art

The Magnetic Lasso Tool In Photoshop
If someone told you lot there'south a pick tool in Photoshop that can select an object in a photograph with 100% accuracy and all you lot take to practice is drag a loose, lazy outline around the object with your mouse, would yous believe them? No? Salubrious. That person is just messin' with your head.
But what if someone told you there'southward a choice tool that can select an object with, say, 80-ninety% accuracy and all you have to do is drag that aforementioned lazy outline around it? Would you believe them at present? Withal no? Well, that'southward too bad, because in that location really is a selection tool like that. Information technology'south chosen the Magnetic Lasso Tool, and with a little practice and a basic understanding of how it works, not only will you exist a believer, just yous just may find yourself hopelessly attracted to it.
This tutorial is from our How to brand selections in Photoshop series.
The Magnetic Lasso Tool is one of three lasso tools in Photoshop. Nosotros've already looked at the offset two - the standard Lasso Tool and the Polygonal Lasso Tool - in previous tutorials. Like the Polygonal Lasso Tool, the Magnetic Lasso Tool can be found nested behind the standard Lasso Tool in the Tools console. To admission it, click and hold your mouse button down on the Lasso Tool until a fly-out carte appears, then select the Magnetic Lasso Tool from the list:
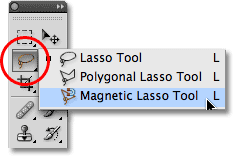
The Magnetic Lasso Tool is hiding behind the standard Lasso Tool in the Tools panel.
One time you've selected the Magnetic Lasso Tool, information technology will appear in place of the standard Lasso Tool in the Tools panel. To switch dorsum to the Lasso Tool later, or to select the Polygonal Lasso Tool, click and hold on the Magnetic Lasso Tool until the fly-out card reappears, then select either of the other two lasso tools from the list:
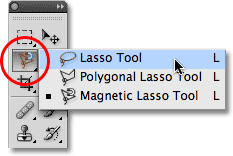
The lasso tool yous selected final appears in the Tools console. Select the other two from the wing-out menu.
You can cycle through the three lasso tools from your keyboard. Just agree down your Shift key and press the letter 50 repeatedly to switch between them (note that you may not need to include the Shift fundamental depending on how you lot have things set up in Photoshop's Preferences).
Why is it called the Magnetic Lasso Tool? Well, dissimilar the standard Lasso Tool which gives y'all no help at all and relies entirely on your own ability to manually trace around the object, usually with less than stellar results, the Magnetic Lasso Tool is an border detection tool, meaning that information technology actively searches for the edge of the object as y'all're moving around it, then snaps the option outline to the edge and clings to it like a magnet!
Does this mean that Photoshop actually recognizes the object in the photo that y'all're trying to select? It can certainly appear that way, just no. As we learned when we looked at why we demand to brand selections in Photoshop, all Photoshop e'er sees is pixels of different color and brightness levels, so the Magnetic Lasso Tool tries to figure out where the edges of an object are by looking for differences in color and brightness values between the object y'all're trying to select and its background.
Shortcodes, Actions and Filters Plugin: Error in shortcode [ads-basics-middle-2]
A Better Icon For Better Selections
Of course, if the Magnetic Lasso Tool was forced to always expect at the unabridged image as information technology tried to notice the edges of your object, chances are it wouldn't do a very good job, and then to continue things simple, Photoshop limits the area where the tool looks for edges. The trouble is that past default, we have no fashion of seeing how broad this area is, and that's considering the mouse cursor for the Magnetic Lasso Tool doesn't really tell the states anything. The little magnet lets us know that we have the Magnetic Lasso Tool selected, of course, but that'southward most it:
An enlarged view of the Magnetic Lasso Tool icon.
For a much more useful icon, press the Caps Lock central on your keyboard. This switches the icon to a circumvolve with a pocket-size crosshair in the centre. The circle represents the width of the area that Photoshop looks for edges. Only the surface area inside the circle is looked at. Everything outside of it is ignored. The closer a potential edge is to the crosshair in the center of the circle, the more importance Photoshop gives it when trying to decide where the edges of your object are:
Irresolute the icon to a circle allows usa to see exactly where Photoshop is looking for edges.
Using The Magnetic Lasso Tool
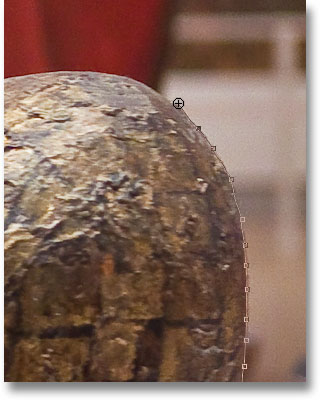
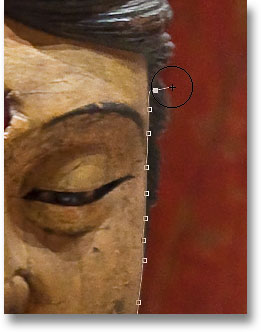
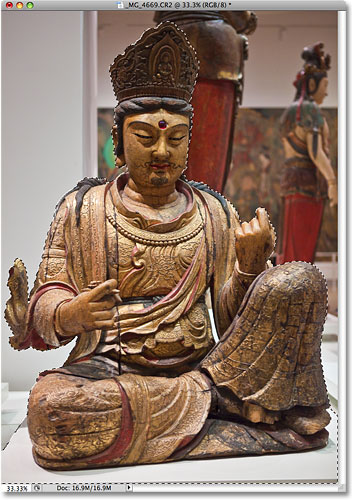
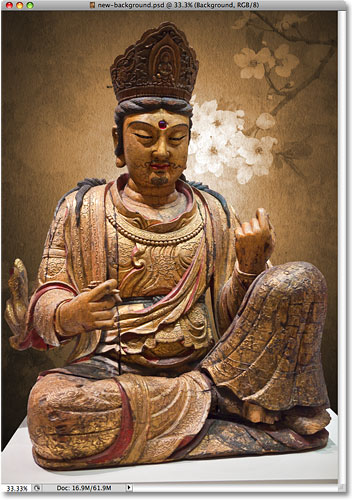
Here'southward a photo I have open in Photoshop of a Chinese sculpture. The edges of the sculpture are well defined, so I could endeavour to select it by tracing around it with the standard Lasso Tool. At least, I could do that if I was looking for an alibi to pull my hair out in frustration. A much improve choice here would exist the Magnetic Lasso Tool since it will end up doing nigh of the work for me:

The Magnetic Lasso Tool should have little trouble selecting the sculpture.
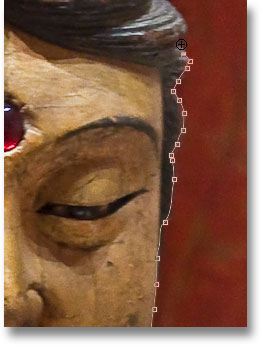
To begin a selection with the Magnetic Lasso Tool, simply move the crosshair in the center of the circle straight over an edge of the object and click once, so release your mouse push button. This sets a starting point for the choice. Once you have your starting signal, move the Magnetic Lasso Tool around the object, always keeping the edge within the boundaries of the circumvolve. You'll run across a sparse line extending out from the cursor equally you drag, and Photoshop volition automatically snap the line to the edge of the object, adding ballast points as it goes along to keep the line attached in place. Dissimilar the standard Lasso Tool, in that location'due south no demand to continue your mouse button held downwards every bit you lot drag around the object:
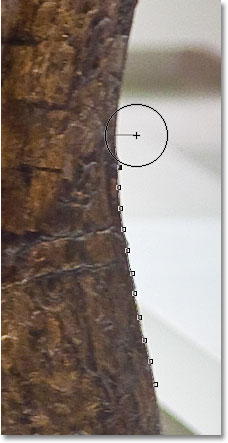
Photoshop snaps a thin line to the border of the object every bit y'all elevate around it.
To zoom in on the prototype as y'all're dragging around the edges, press Ctrl++ (Win) / Control++ (Mac). Press Ctrl+- (Win) / Command+- (Mac) after to zoom out. To scroll the image around inside the document window when you're zoomed in, hold downwardly your spacebar, which temporarily switches you to the Hand Tool, then click and drag the image around as needed. Release the spacebar when you're done.
Changing The Width Of The Circumvolve
You tin adjust the width of the circle, which changes the size of the area that Photoshop looks at for edges, using the Width selection in the Options Bar. If the object y'all're selecting has a well-defined edge, you lot can use a larger width setting, which volition also allow you to movement faster and more freely around the object. Use a lower width setting and move more than slowly around objects where the edge is not so well defined.

The Width option adjusts the width of the expanse that Photoshop looks at to find edges.
The but trouble with the Width option in the Options Bar is that yous take to set it before y'all click to begin your selection, and there'southward no manner to change it in one case you lot've started dragging around the object. A more convenient way to adapt the width of the circumvolve is by using the left and right bracket keys on your keyboard. This gives you lot the power to adjust the size of the circle on the fly equally you're working, which is peachy since you lot'll often need to adjust its size as you lot laissez passer over unlike parts of the image. Printing the left bracket key ( [ ) to brand the circle smaller, or the right bracket key ( ] ) to brand it larger. You lot'll run into the value for the Width choice changing in the Options Bar as you press the keys, and yous'll encounter the circle itself changing size in the document window:
Make the circle smaller and keep the crosshair straight over the edge when passing over potential problem areas.
Edge Dissimilarity
While the width of the circle determines the size of the area that Photoshop looks at for edges, a second and equally of import pick when using the Magnetic Lasso Tool is Edge Contrast, which determines how much of a difference at that place must be in color or brightness value between the object and its background for Photoshop to consider something an edge.
You lot'll find the Edge Contrast choice in the Options Bar to the correct of the Width option. For areas with loftier contrast between the subject field and its groundwork, you can apply a higher Edge Contrast value, along with a larger Width value (larger circle). Use lower Edge Dissimilarity and Width values for areas with poor contrast betwixt the object and background:

Use lower Edge Contrast values for areas where the color or effulgence value of the object and groundwork are similar.
Like the Width choice, the Edge Contrast selection in the Options Bar can only be prepare before you click to begin your selection, which doesn't brand information technology very useful. To change information technology on the fly equally you're working, press the period cardinal ( . ) on your keyboard to increase the dissimilarity value or the comma ( , ) to decrease it. You'll see the value changing in the Options Bar.
Frequency
As you make your way around the object, Photoshop automatically places anchor points (piffling squares) forth the edge to "ballast", or spike, the line in place. If you lot find that there's also much of a gap between anchor points, making it difficult to proceed the line clinging to the border, you can adjust how often Photoshop adds ballast points with the Frequency option in the Options Bar, although once again, you'll demand to gear up this option before you click to begin the selection. The higher the value, the more anchor points will exist added, but mostly, the default value of 57 tends to piece of work well:

Arrange the Frequency value to change how often Photoshop lays down anchor points.
Rather than changing the Frequency value, an easier fashion to work is to simply add an anchor point manually whenever you demand i. If Photoshop seems to be having problem keeping the line in place at a certain spot, simply click on the edge of the object to add an anchor point manually, and so release your mouse button and continue on.
Fixing Mistakes
If an anchor betoken gets added in the incorrect spot, either by you or by Photoshop, printing the Backspace (Win) / Delete (Mac) key on your keyboard to remove the last anchor point that was added. If you continue pressing Backspace / Delete, you lot'll remove additional points in the contrary club they were added, which is helpful for times when the selection outline starts acting a little crazy and unpredictable, as it sometimes does. Here, I've completely missed the hair on side of the sculpture'due south face, so I'll need to press Backspace / Delete a few times to remove the unwanted anchor points, so try again:
Press Backspace (Win) / Delete (Mac) to remove ballast points when mistakes happen.
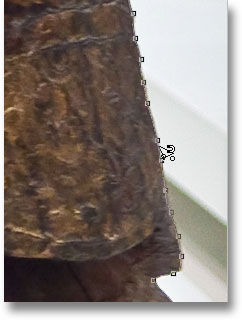
This time, using a much smaller circle width, I have better luck. Adding some anchor points manually besides helps:
Click to add an anchor point manually whenever yous need one.
If you've completely messed upwardly with the Magnetic Lasso Tool and need to start over, press the Esc key to clear abroad everything you've washed.
Switching Between Lasso Tools
The Magnetic Lasso Tool can often do an amazing job of selecting an object on its ain, simply it also gives u.s.a. easy access to Photoshop's other two lasso tools if needed. To temporarily switch to either the standard Lasso Tool or the Polygonal Lasso Tool, concur down your Alt (Win) / Option (Mac) key and click on the edge of the object. What you do next determines which of the two lasso tools you switch to.
If yous continue to hold your mouse push button down and begin dragging, you'll switch to the standard Lasso Tool then you can draw a freeform pick outline effectually areas where the Magnetic Lasso Tool is having problem. When y'all're done, release your Alt / Pick central, and then release your mouse button to switch dorsum to the Magnetic Lasso Tool.
If you release your mouse push button afterwards you click with the Alt / Choice key held downwards and move your mouse cursor away from the signal yous clicked on, y'all'll switch to the Polygonal Lasso Tool which is handy for selecting areas where the edge of the object becomes straight. Go along Alt / Option held down as you click from signal to point to add directly line segments. To switch dorsum to the Magnetic Lasso Tool when you're washed, release your Alt / Option key, then click on the border of the object to add together a bespeak and release your mouse button.
I want to include the platform the sculpture is sitting on in my selection, and since the edge of the platform is straight, I'll temporarily switch to the Polygonal Lasso Tool:
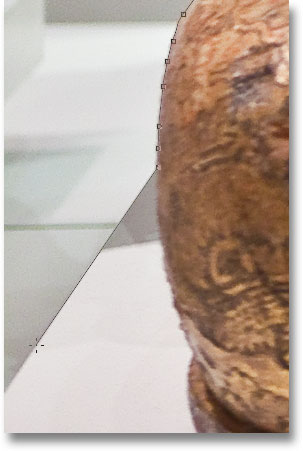
The straight edge of the platform is exactly the sort of matter the Polygonal Lasso Tool was designed for.
Closing The Choice
Once y'all've made your manner around the entire object, click back on your initial starting point to complete the option. When y'all're close enough to the starting point, you'll see a pocket-size circle appear in the bottom correct of the cursor icon, letting yous know that yous tin can now click to close the selection:
When a small-scale circle appears in the bottom right corner of the cursor icon, click to close the pick.
And with that, the sculpture is selected:
The animated selection outline, or "marching ants", appears equally soon equally you lot close the selection.
Subtracting Areas From The Initial Selection
As I examine the photograph more closely, I notice that there'due south a modest, narrow gap in the sculpture between the side of the body and the arm on the right, with the groundwork showing through information technology:
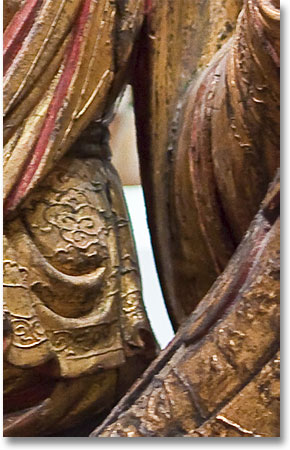
Office of the initial option needs to be removed.
I demand to remove that area from the selection. To practice that, with the Magnetic Lasso Tool however selected, I'll agree downwardly my Alt (Win) / Option (Mac) cardinal, which volition temporarily switch me to the Subtract from Selection mode. A small minus sign ( - ) appears in the bottom right corner of the cursor icon letting me know that I'k about to remove part of the existing option:
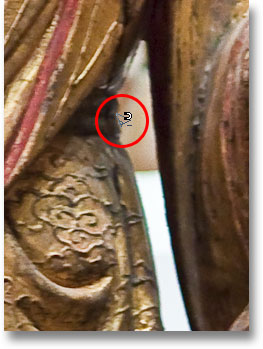
Concord down Alt (Win) / Selection (Mac) to temporarily switch to Decrease from Option mode.
With Alt / Selection held down, I'll click once to prepare my starting bespeak, and so I'll release my mouse button and drag around the edge of the area I demand to remove. Once I beginning dragging, I can release the Alt / Choice key. There's no demand to keep it held down the entire time. Photoshop will keep me in Subtract from Selection mode until I click back on the initial point to complete the pick. I'll press the Caps Lock fundamental one time once again to switch to the circumvolve icon so I tin can meet exactly where Photoshop is looking for edges:
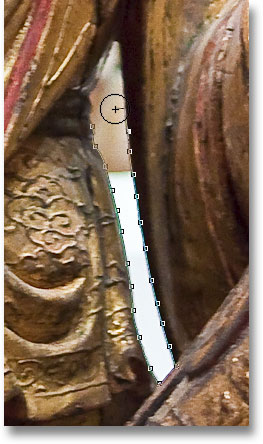
Dragging around the surface area that needs to exist removed with the Magnetic Lasso Tool.
Once I've made my way effectually the gap, I'll click back on the initial starting point to close the selection, removing the unwanted area. Only the sculpture itself, along with the platform information technology's sitting on, remains selected:

The narrow gap to the left of the sculpture's arm is no longer office of the choice.
With the sculpture now selected, anything I do next will touch only the sculpture. The rest of the photo will exist ignored. For case, I tin press the alphabetic character 1000 on my keyboard to chop-chop select Photoshop'south Move Tool, and so I'll click on the sculpture and drag it into a second image I take open to give it a different background:
Swapping the background is simply one of an countless number of things you can do thanks to selections.
Removing A Selection
When y'all're done with your selection outline and no longer need it, you can remove it by going upwardly to the Select menu at the top of the screen and choosing Deselect, or you tin can press the keyboard shortcut Ctrl+D (Win) / Command+D (Mac). Or, for the fastest mode to remove a selection, only click anywhere inside of the document with the Magnetic Lasso Tool or with any of Photoshop's other choice tools.
The Magnetic Lasso Tool is without a doubt one of the best selection tools we accept to work with in Photoshop, giving us much meliorate results than we could get with the standard Lasso Tool in less fourth dimension and with less try and frustration. However, it does have a bit of do with the Width and Border Contrast options before you'll experience at home with it, and as with about things in life, information technology's not perfect.
For best results, use the Magnetic Lasso Tool as a neat way to begin a choice, since information technology can usually do lxxx-ninety% of the work for you. Drag the Magnetic Lasso Tool around the object once, creating your initial choice, so zoom in and whorl around the selection outline looking for any areas where the Magnetic Lasso Tool messed up. Use the standard Lasso Tool, along with the Add to Pick and Decrease from Pick modes, to fix upward any problems.
Other Stuff
© 2022 Photoshop Essentials.com.
For inspiration, not duplication.
Site pattern by Steve Patterson.
Photoshop is a trademark of Adobe Systems Inc.
Source: https://www.photoshopessentials.com/basics/selections/magnetic-lasso-tool/
0 Response to "Can You Use Magnetic Lasso to Make Line Art"
Post a Comment